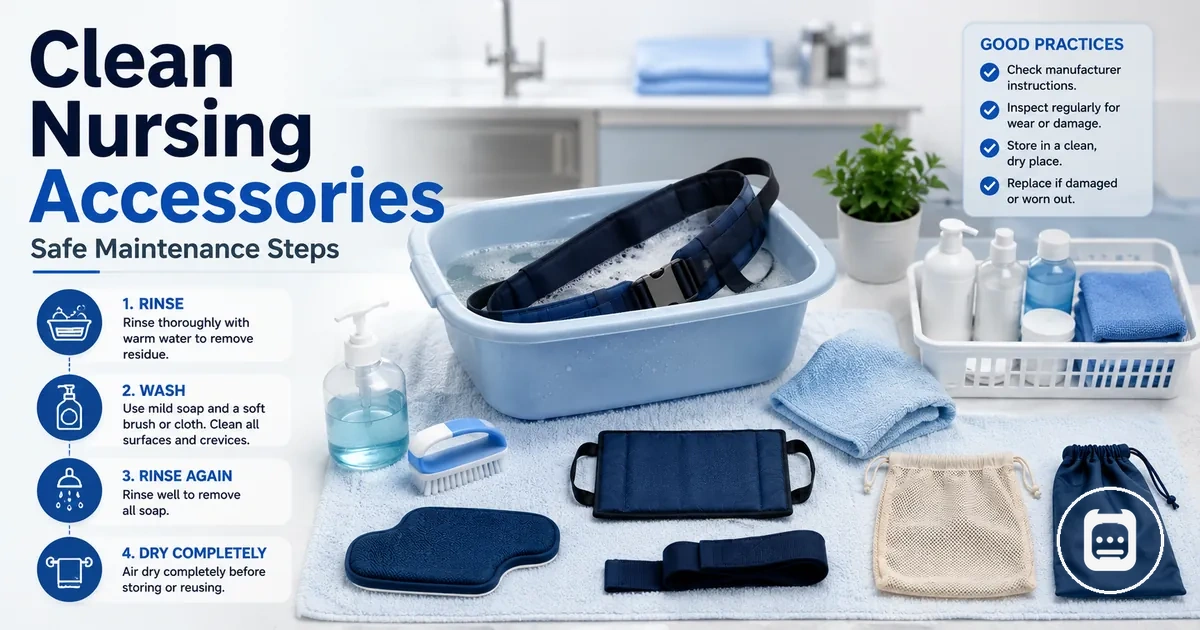
Safe Cleaning for Nursing Accessories
Nursing accessories require safe cleaning as a maintenance task that helps protect hygiene, usability, and material condition during everyday use. Safe cleaning focuses on removing dirt, residue, and routine surface buildup from nursing accessories while supporting safe reuse when appropriate. In this context, safe cleaning is routine maintenance rather than sterilization.
Routine cleaning can help keep washable parts and wipeable surfaces in good condition, but the appropriate cleaning level often depends on material limits, visible contamination, and how the accessory is used or stored. As part of the broader nursing accessories hub, cleaning decisions should balance care needs with manufacturer instructions and workplace rules when they apply. A useful boundary is that routine cleaning addresses normal use conditions, while conditional disinfection may be considered when exposure circumstances require a higher level of surface treatment.
When nursing accessories move between pockets, bags, workstations, or storage areas, surfaces can collect dust, residue, moisture, or handling-related buildup over time. Washable parts, wipeable surfaces, drying needs, and moisture risk may vary by accessory design, which means the most suitable cleaning method often depends on the material and condition of the item. Understanding these differences starts with identifying which nursing accessories need regular cleaning.
Material limits, contamination level, accessory construction, and drying requirements can all influence cleaning outcomes. Because compatibility and care requirements vary, cleaning methods should follow available care guidance when provided, and disinfection should be considered only when the accessory material, contamination level, and usage situation support it.
Which Nursing Accessories Need Regular Cleaning
Nursing accessories are commonly identified for regular cleaning based on contact level, surface exposure, and storage exposure. Accessories that are handled often, carried throughout a shift, or moved between pockets, bags, and work areas may collect more surface residue over time. Contact and storage exposure are the main triggers that determine cleaning priority.
Which Nursing Accessories Need Regular Cleaning depends less on accessory type alone and more on how the item is used. High-contact items such as a badge holder, badge reel, organizer, pouch, silicone accessory, or small tool may need more attention when they are handled repeatedly, exposed to shared surfaces, or stored in enclosed spaces. Pocket-carried items, bag-stored items, and accessories used throughout a shift often have higher cleaning priority because of repeated surface contact, with priority tied to frequency of handling.
The image below labels common high-contact accessories that may require regular cleaning based on handling and storage conditions.
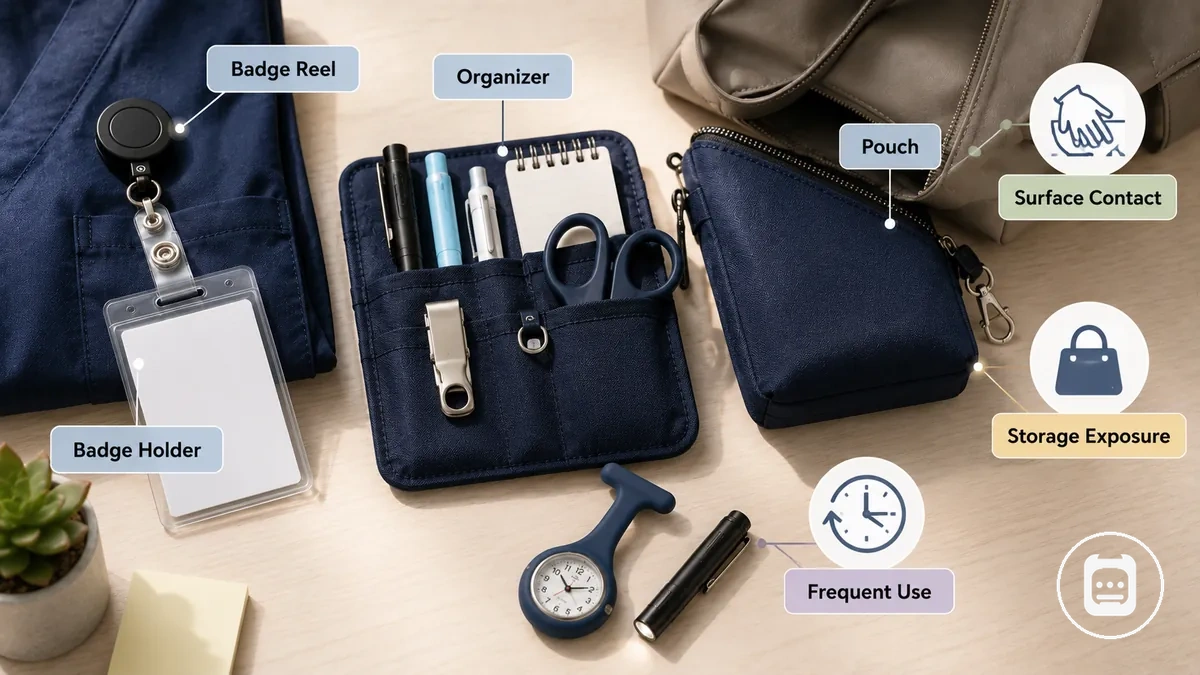
- Badge holder: May need cleaning when touched frequently or exposed to shared surfaces during daily use.
- Badge reel: Cleaning priority can increase when the reel is handled repeatedly throughout a shift.
- Organizer: May benefit from regular cleaning when compartments are opened often and exposed to routine handling.
- Pouch: May require attention when stored in pockets or bags where surface exposure can accumulate.
- Silicone accessory: Cleaning needs can increase when the accessory is handled often or exposed to moisture and residue.
- Small tool: Priority may depend on handling frequency, storage exposure, and contact with commonly touched surfaces.
- Frequently touched non-critical accessories: May need routine cleaning when repeated contact affects hygiene priority or surface condition.
Cleaning, Disinfecting, and Sanitizing Nursing Accessories
Cleaning, disinfecting, and sanitizing nursing accessories are different maintenance levels with different purposes. Cleaning focuses on removing visible soil and residue from surfaces, sanitizing aims to reduce surface contamination levels, and disinfecting uses a stronger approach that may be appropriate in certain exposure situations. The difference between cleaning, sanitizing, and disinfecting is based on purpose, strength, and material risk.
Cleaning, Disinfecting, and Sanitizing Nursing Accessories can be easier to understand when the methods are compared side by side. The image below compares maintenance levels by showing surface treatment methods, cleaning materials, and drying considerations.
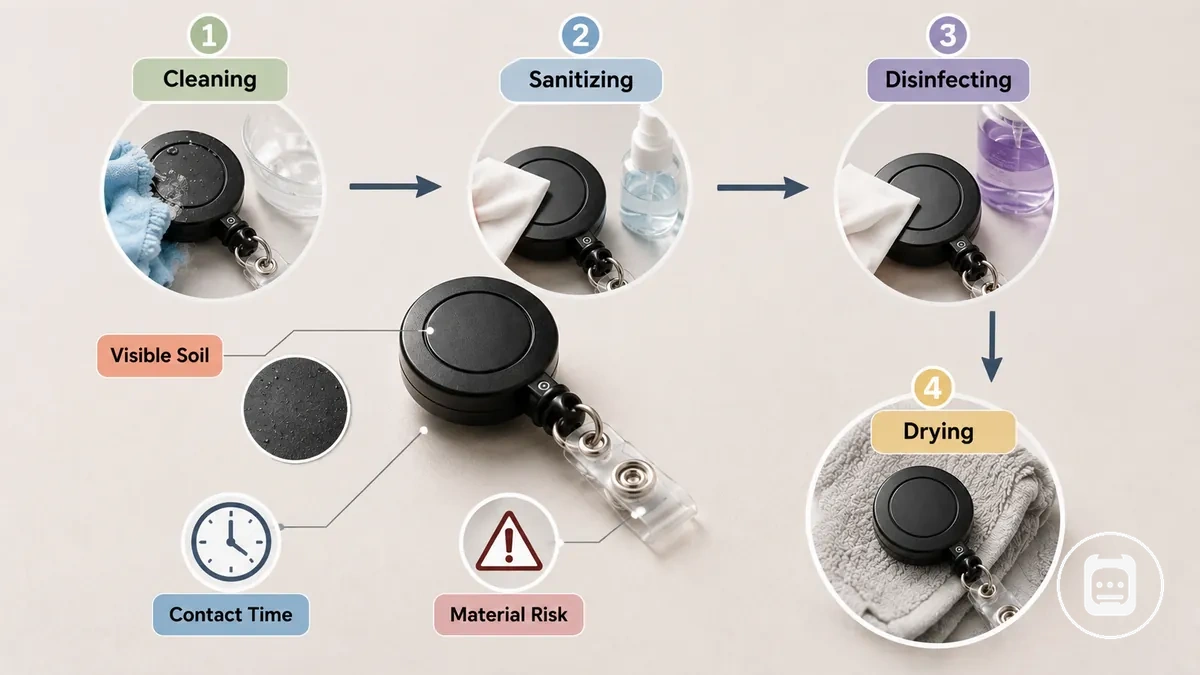
| Method | Main Purpose | When It May Fit | Material Caution |
|---|---|---|---|
| Cleaning | Remove visible soil and routine surface residue | After routine handling and regular use | Usually lower material risk when compatible cleaning products are used |
| Sanitizing | Reduce surface contamination levels | When additional surface treatment may be preferred after cleaning | Residue control, rinsing needs, and drying considerations may vary by product |
| Disinfecting | Address possible contamination with a stronger treatment approach | When exposure circumstances suggest a higher maintenance level | Material tolerance and label-specific contact time should be considered |
Visible soil should generally be addressed before stronger surface treatments are considered. Cleaning products, sanitizing products, and disinfecting products may have different contact time requirements, residue control considerations, rinsing needs, and drying recommendations. Product compatibility can vary by accessory material, so material risk should be evaluated before applying stronger treatments. Material compatibility remains an important decision boundary.
Cleaning, sanitizing, and disinfecting should be selected according to accessory condition, exposure level, and material compatibility rather than a universal rule. For broader hygiene and safety factors, manufacturer instructions, clinical protocols, and facility rules should take priority when they are more restrictive than general maintenance guidance.
When Basic Cleaning Is Enough
Basic cleaning is often enough when a nursing accessory has only light surface dirt from normal handling or low-risk storage. Dust, lint, and ordinary residue can usually be removed through routine cleaning such as washing or wiping. The basic-cleaning threshold is limited to minor surface buildup without visible contamination or fluid exposure.
When Basic Cleaning Is Enough becomes easier to judge by looking at ordinary use conditions. The image below shows ordinary surface dirt that may be suitable for routine cleaning.
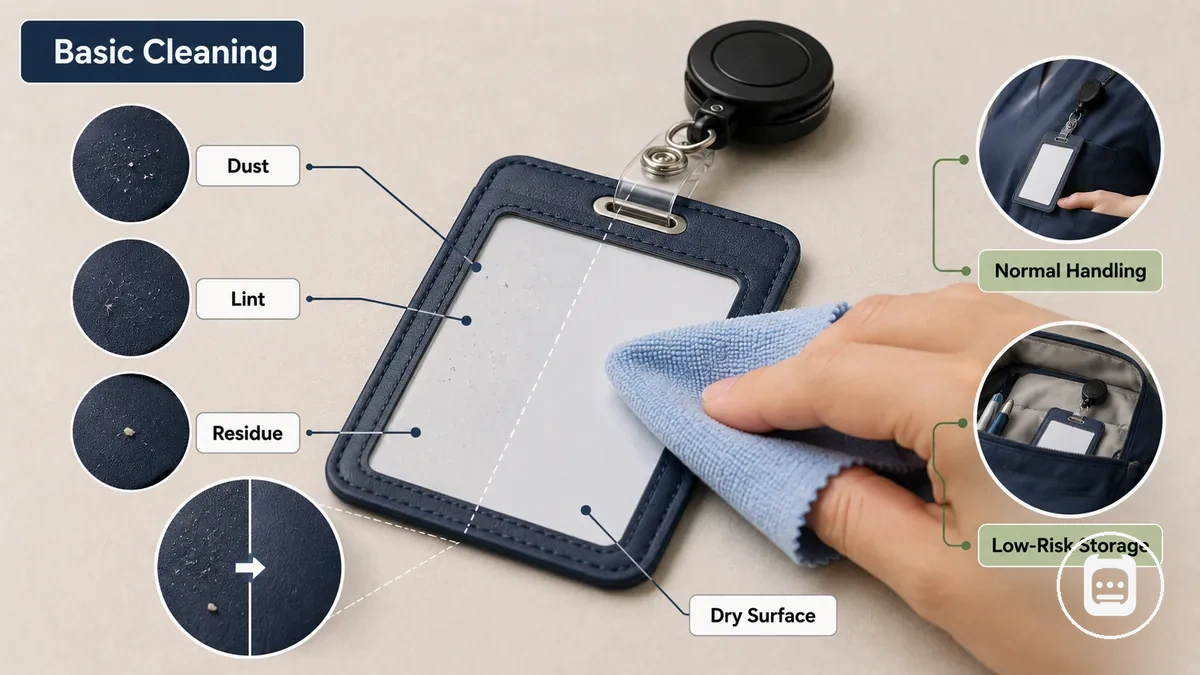
- Light surface dirt: Dust, lint, or minor residue can be suitable for basic cleaning.
- Normal handling: Everyday hand contact may only require washing or wiping.
- Low-risk storage: Accessories kept in clean pockets, pouches, or drawers may need routine cleaning rather than stronger treatment.
- Material condition: A dry surface with ordinary residue may respond well to simple cleaning methods.
For example, a badge holder with light dust from daily use may only need an everyday wipe to remove residue. Visible contamination, fluid exposure, or facility-defined risk should be treated as a different threshold than ordinary handling.
When Disinfection Is Needed
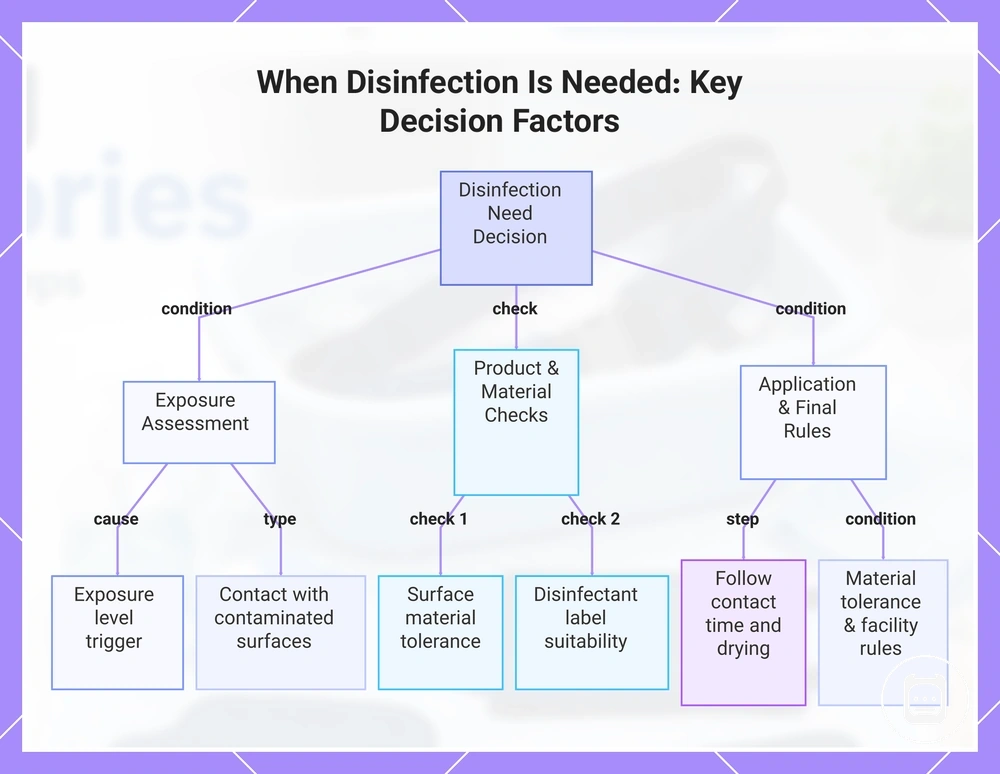
Disinfection may be needed when a nursing accessory has been exposed to a higher exposure level or a potentially contaminated situation. The need for disinfection depends on exposure type, surface material, and whether the accessory can tolerate a stronger cleaning method. Exposure level is the main trigger for deciding when disinfection should be considered.
- Exposure type: Consider disinfection when an accessory may have contacted potentially contaminated surfaces or conditions.
- Surface material: Check whether the surface material can tolerate a chemical wipe or other disinfection method.
- Disinfectant label: Follow the disinfectant label to determine whether the product is suitable for the accessory surface.
- Contact time: Use the contact time specified on the disinfectant label rather than assuming a shorter application is sufficient.
- Residue control and drying: Consider residue control and allow appropriate drying according to product directions and material needs.
Accessories that cannot tolerate moisture or chemical wipes may require additional caution before disinfection is attempted. Material tolerance and facility rules should guide the final decision when exposure conditions suggest a need for disinfection.
This chart shows the main conditions and checks to determine when disinfection is required for a nursing accessory.
Safe Cleaning Supplies for Nursing Accessories
Safe cleaning supplies are materials that help remove residue while reducing the risk of damage to nursing accessories. The most suitable supply depends on the accessory material, soil level, and surface condition. Supply choice is a material-dependent decision.
Mild soap, a soft cloth, and a small brush can be useful for routine surface cleaning when the accessory material can tolerate them. A disinfectant wipe may be appropriate in certain situations, but label suitability, residue control, and drying should be considered before use. Water control can help limit unnecessary moisture exposure, while a towel and adequate drying space may support proper drying after cleaning. When the material is uncertain, gentler supplies should be tried before stronger chemicals because they generally reduce damage risk.
The table below compares common cleaning supplies by use case, material caution, and after-cleaning considerations. Compatibility varies by accessory construction, so washability should not be assumed.
| Supply | Best Use | Material Caution | After-Cleaning Step |
|---|---|---|---|
| Mild soap | Routine surface cleaning and residue removal | May not be suitable for every material or finish | Remove remaining residue and allow drying |
| Soft cloth | Wiping light dirt and surface residue | Use a clean cloth to reduce transfer of debris | Allow the surface to dry |
| Small brush | Cleaning seams, corners, or textured areas | Excessive scrubbing may affect delicate surfaces | Remove loosened debris and dry the area |
| Disinfectant wipe | Situations that may require stronger cleaning | Check disinfectant label suitability for the surface material | Consider residue control and drying needs |
| Towel and drying space | Moisture management after cleaning | Drying conditions may affect materials differently | Allow thorough drying before storage or reuse |
Mild Cleaners, Disinfectant Wipes, and Drying Supplies
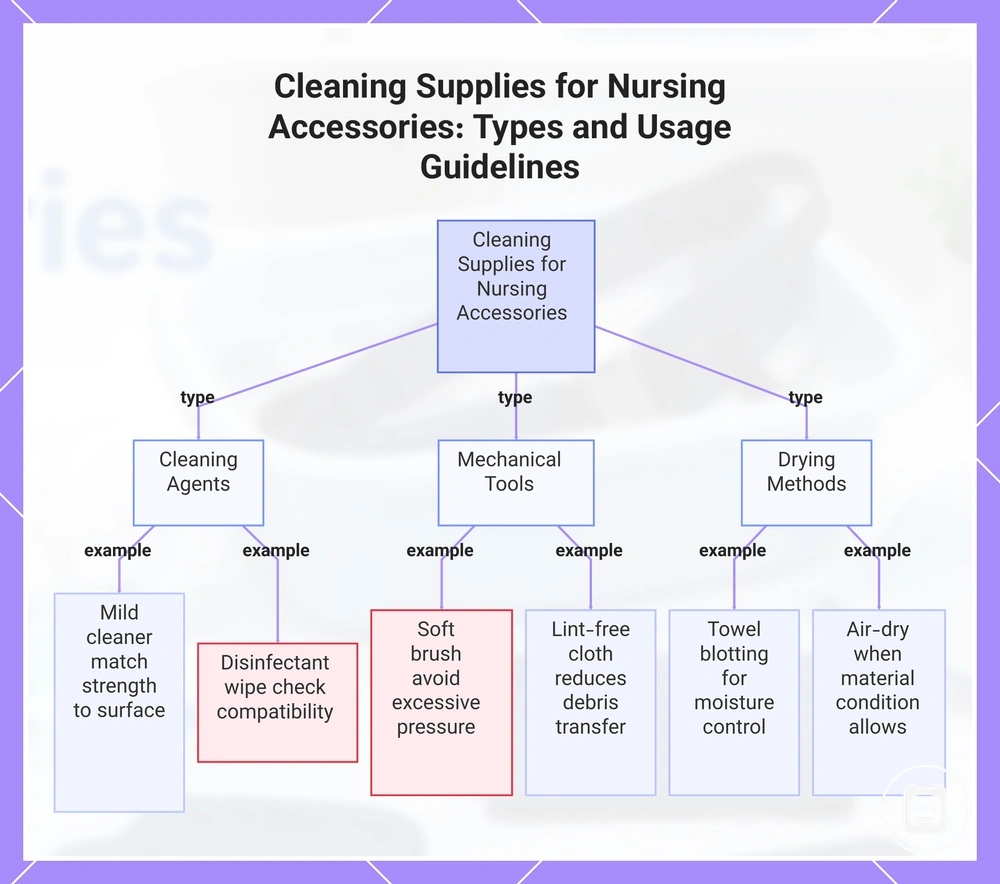
Mild cleaners, disinfectant wipes, and drying supplies support different parts of the cleaning process. A mild cleaner can help remove routine residue, while a disinfectant wipe may be considered when a surface requires stronger treatment that suits the material. Matching the supply type to the cleaning job helps support effective maintenance.
- Mild cleaner: Often used for routine surface cleaning when the material can tolerate soap or a gentle cleaner; cleaner strength should match the surface condition.
- Disinfectant wipe: May be useful for higher-contact surfaces, but wipe compatibility should be checked before use on sensitive materials.
- Soft brush: Can help remove dirt from seams, edges, or textured areas; excessive pressure may affect delicate surfaces.
- Lint-free cloth: Commonly used for wiping residue and drying surfaces; a clean cloth may help reduce transfer of debris.
- Drying supply: Towel blotting supports moisture control, while air-drying can support reuse readiness when drying space and material condition allow.
Supply function and safe use depend on surface type, moisture exposure, and material condition. Nursing accessories may respond differently to cleaners, wipes, cloths, and drying methods, so material-dependent caution remains important.
This chart shows the main categories of cleaning supplies for nursing accessories and key usage guidelines, including material-dependent precautions.
Cleaning Materials to Avoid on Delicate Accessories
Cleaning materials that are too aggressive may affect delicate accessories and reduce usability over time. Finishes, straps, clips, printed surfaces, adhesives, and moving parts can be more sensitive than durable wipeable surfaces. Damage risk often increases when a harsh material is used on a delicate part or surface.
- Abrasive pads: A rough pad may affect finishes, printed surfaces, or clear coatings through repeated scrubbing.
- Excessive soaking: Prolonged moisture exposure may affect adhesives, fabric components, or parts that are not intended for extended wet conditions.
- Strong solvents: Solvent-based cleaners may affect printed surfaces, coatings, or materials with higher chemical sensitivity.
- Bleach-like products: These products may increase risk for delicate surfaces or colored components when not specifically approved for the accessory material.
- High heat: Heat exposure may affect straps, adhesives, fabric sections, or moving parts that rely on material stability.
- Oversaturated wipes: Excess moisture from a chemical wipe may reach seams, adhesive areas, or enclosed components where drying is slower.
Durable wipeable surfaces may tolerate a wider range of cleaning methods than accessories with fabric, adhesive, printed, or moving parts. Cleaning methods and products should follow manufacturer instructions when specific care guidance is provided.
How to Clean Nursing Accessories Step by Step
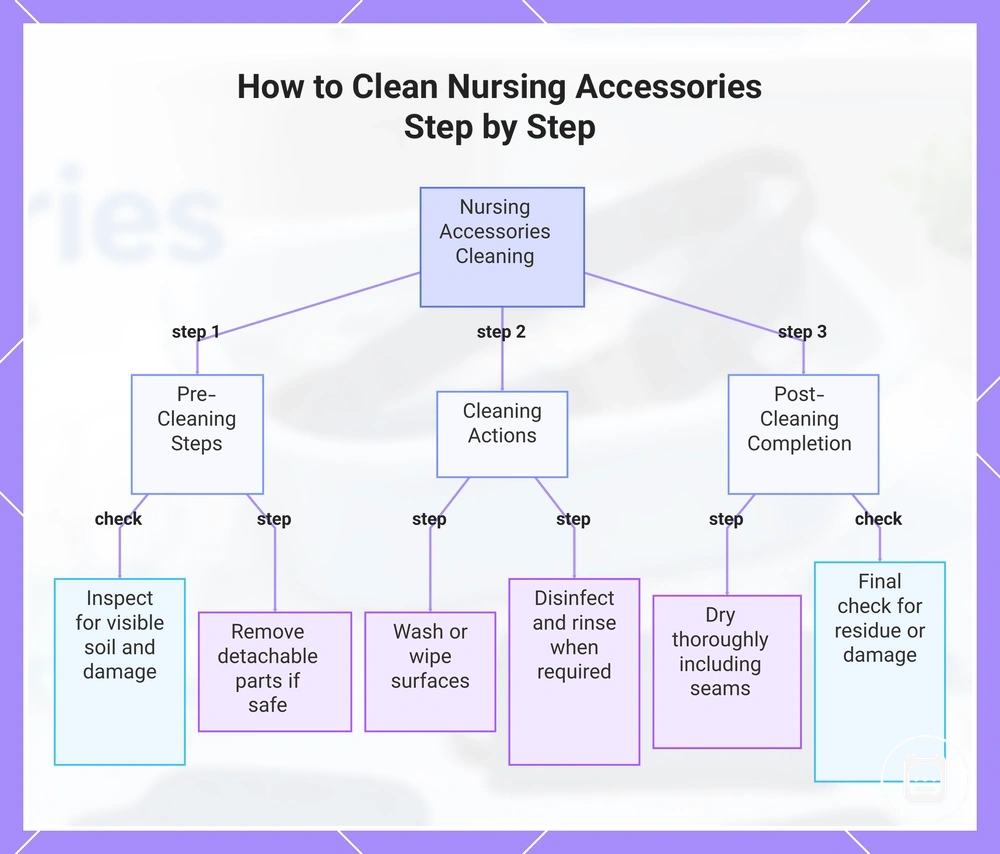
Cleaning nursing accessories starts with identifying dirt, residue, and material-related risks before any cleaning method is chosen. A structured cleaning workflow can help reduce unnecessary wear while supporting safe reuse. The workflow changes by material, washability, and visible soil level.
Use the steps below as a general process that can be adjusted to the accessory condition and material type. Stop the cleaning process if the accessory shows damage, contains moisture-sensitive parts, or has unclear care instructions.
- Inspect: Check the accessory for visible soil, wear, loose parts, moisture-sensitive components, or unclear care requirements before cleaning.
- Separate parts: Remove detachable components when separation is possible and does not risk damage to the accessory.
- Remove soil: Remove loose dirt, dust, lint, or surface residue before applying water, wipes, or cleaning solutions.
- Wash or wipe: Wash washable surfaces or wipe non-washable surfaces using a method that matches the material condition and soil level.
- Disinfect when needed: Disinfect only when the exposure condition suggests a higher cleaning level and the material can tolerate the product used.
- Rinse if required: Rinse surfaces when the cleaning method or product instructions indicate that residue should be removed.
- Dry: Dry all cleaned parts thoroughly before reassembly, storage, or reuse, paying attention to seams and enclosed areas where moisture may remain.
- Final check: Perform a final check for remaining residue, trapped moisture, loose parts, or signs of damage before safe reuse.
A final check helps confirm that the accessory is clean, dry, and suitable for continued use. If cleaning reveals damage or material deterioration, further cleaning should stop until the condition can be assessed.
This chart shows the structured cleaning workflow for nursing accessories, from pre-cleaning inspection through final drying and check.
Separate Washable Parts and Remove Visible Dirt
Separate washable parts and remove visible dirt before applying any cleaner. Removable parts can make cleaning easier, while visible dirt, lint, and debris should be cleared from surfaces, seams, and corners first. This preparation step helps reduce trapped residue and lowers the risk of unnecessary wear during cleaning.
- Empty pouch contents: Remove pouch contents before cleaning so dirt and debris are easier to identify and remove.
- Remove badge inserts: Take out badge inserts when they are designed to be removable so moisture and residue are less likely to become trapped.
- Check seams and corners: Remove debris, lint, and visible dirt from seams and corners before using any cleaning method.
- Avoid forced removal: If removable parts cannot be separated safely, leave them in place and avoid forced disassembly of non-removable components.
Detachable parts should only be separated when the accessory design allows it. Components that are not intended to be removed should not be forced apart.
Wash or Wipe Without Damaging the Accessory
Wash or wipe based on the surface condition and moisture tolerance of the accessory. Use light washing on washable surfaces and gentle wiping on wipeable surfaces while controlling pressure around seams, straps, clips, printed areas, and moisture-sensitive parts. The method should match the material condition, with washable surfaces handled differently from wipe-only accessories.
| Washable Surfaces | Wipe-Only Accessories |
|---|---|
| Light washing may be suitable when the surface is designed to tolerate water exposure and routine cleaning. | Gentle wiping may be preferred when moisture-sensitive parts, moving components, or printed areas could be affected by excess water. |
| Use only the amount of water and pressure appropriate for the material condition. | Apply light pressure and avoid unnecessary moisture around seams, straps, clips, and sensitive areas. |
Moisture-sensitive parts may require extra caution because excess water can reach enclosed or moving components. Printed areas, straps, and clips should be cleaned with controlled pressure rather than aggressive scrubbing. Water exposure, pressure, and cleaning intensity should follow manufacturer-dependent material limits when available.
Disinfect Only When the Material Allows It
Disinfect only when the material compatibility and exposure level support a stronger cleaning method. A disinfectant may be appropriate after higher surface exposure, but the accessory surface and care instructions should guide the decision. Material compatibility remains the key condition before using a chemical wipe or other disinfecting method.
- Check the disinfectant label to confirm that the product may be suitable for the accessory surface.
- Verify whether the material can tolerate disinfection, especially around printed areas, adhesive sections, electronic components, fabric, or other moisture-sensitive parts.
- Consider the exposure level and surface contact before choosing to disinfect rather than using routine cleaning alone.
- Follow any instructions related to residue control, rinsing, and drying when those steps are recommended for the material or product used.
A damaged item or absorbent material may become harder to clean safely after repeated exposure or contamination. In those situations, when to replace accessories may be a more appropriate consideration than repeated disinfection attempts.
Dry Accessories Fully Before Reuse
Dry accessories fully before reuse so moisture does not remain in pockets, bags, badge areas, or storage spaces. Proper drying depends on air circulation and moisture control after cleaning. An accessory should be dry before returning to reuse or storage.
- Seams: Check seams for trapped moisture and allow additional air-dry time if damp areas remain.
- Pouch interiors: Verify that pouch interiors are dry before placing items back inside.
- Badge sleeves: Inspect badge sleeves for moisture that may remain between enclosed surfaces.
- Clips and corners: Check clips and corners where moisture can collect and dry more slowly.
- Storage readiness: Use towel blotting and air circulation to support drying before placing the accessory into storage.
Moisture left in seams, pouch interiors, badge sleeves, clips, or corners may contribute to odor, residue buildup, or material wear over time. Heat drying may be appropriate only when the accessory material allows it, so moisture-sensitive materials should follow their care instructions.
Cleaning Differences by Nursing Accessory Type
Cleaning differences by nursing accessory type are mainly determined by accessory material, surface design, and moisture-sensitive parts. A cleaning method that suits one accessory type may not be appropriate for another. Accessory design and material change the method.
Badge items often contain enclosed sections, moving parts, or inserts that may need more careful moisture control than flat wipeable surfaces. Organizers can include seams, pockets, and pouch interiors where residue or moisture may collect. Silicone accessories and plastic accessories may respond differently to a cleaning method because surface shape, flexibility, handles, crevices, and drying needs can vary. These type-specific cleaning differences focus on maintenance rather than buying or organization advice.
The table below compares accessory type, material or part, cleaning action, and caution or drying need. Individual materials and construction details vary, so these examples are general cleaning considerations rather than universal rules.
| Accessory type | Material or part | Cleaning action | Caution or drying need |
|---|---|---|---|
| Badge items | Badge holder surface or insert area | Gentle wiping and moisture control | Check enclosed areas before drying and reuse |
| Badge reels | Housing and moving parts | Light surface cleaning when appropriate | Excess moisture may reach internal components |
| Organizers | Seams, pockets, and pouch interiors | Clean visible residue and inspect storage areas | Dry pouch interiors and seams fully |
| Silicone accessories | Flexible wipeable surfaces | Wash or wipe according to material condition | Confirm surfaces are dry before storage |
| Plastic accessories | Rigid outer surfaces and corners | Wipe surfaces and inspect edges | Moisture may remain in corners or joints |
| Small tools | Handles, crevices, and non-critical surfaces | Clean accessible surfaces carefully | Crevices may require additional drying attention |
Badge Holders and Badge Reels
Badge holders and badge reels are high-touch accessories that may include plastic, metal, fabric, and moving parts. Cleaning should focus on exposed surfaces while protecting the printed badge insert and limiting moisture around mechanical areas. Badge holders and badge reels require part-level attention because they are handled frequently.
- Sleeve: Wipe the badge holder sleeve gently and remove the printed badge insert first when possible to help protect the card surface.
- Clip: Clean the clip with controlled moisture, especially when the clip includes metal components or moving contact points.
- Reel face: Wipe the reel face without oversaturation so moisture is less likely to reach the reel mechanism.
- Cord or strap: Clean the cord or strap according to its material, using additional care with fabric or absorbent sections.
- Drying: Dry around the clip, reel face, cord, and strap before reuse because moisture near the reel mechanism may affect function.
Do not soak a badge reel or apply chemicals directly to an identification card. Oversaturation should be avoided around the reel mechanism and printed badge insert.
Organizer Pouches and Washable Nurse Organizers
Organizer pouches and washable nurse organizers can collect debris inside pockets, seams, and other interior surfaces that are harder to clean than exposed areas. Cleaning starts by emptying the organizer and checking washability because fabric, coated surfaces, and structural details affect the cleaning method. Organizer structure and material determine how cleaning and drying should be approached.
- Empty contents: Remove all items from the organizer pouch before cleaning so interior surfaces can be inspected.
- Pockets and seams: Check pockets and seams for trapped debris, lint, or residue that may remain after surface cleaning.
- Zippers: Clean around zippers carefully because dirt may collect near zipper tracks and folded areas.
- Fabric or coated surface: Clean fabric and coated surface materials according to their care requirements. Machine washing may be appropriate only when the washable nurse organizer is designed for it.
- Removable insert: Remove and clean a removable insert separately when the organizer design allows it.
- Drying time: Allow adequate drying time before reuse because thick fabric, layered pockets, and enclosed seams may dry more slowly than exposed surfaces.
Washability and disinfection needs vary by material and construction. A nurse organizer should be cleaned and dried according to its fabric, coated surface, removable insert, and overall structure.
Silicone, Plastic, and Wipeable Accessories
Silicone, plastic, and other wipeable accessories often allow simpler cleaning because residue can usually be removed from the surface without deep washing. Material response to moisture and cleaners can still vary by surface type, finish, and construction. Wipeable does not mean every material has the same chemical compatibility.
- Silicone: Silicone surfaces may have flexibility and grooves that can hold residue, making careful wiping and drying important.
- Hard plastic: Hard plastic surfaces are often easy to wipe, but corners and surface texture can collect residue that should be removed before drying.
- Coated surface: A coated surface may respond differently to cleaning products, so disinfectant tolerance and compatibility should be checked before use.
Surface texture affects how easily residue is removed, and grooves can retain moisture after cleaning. Disinfectant tolerance, drying needs, and cleaner selection depend on the specific silicone, plastic, or wipeable surface being cleaned.
Small Nurse Tools and Non-Critical Accessories
Small nurse tools and non-critical accessories include items such as pens, clips, non-critical scissors, and similar utility items that typically require routine surface cleaning. Residue can collect on handles, storage contact points, and frequently touched areas during regular use. This section applies only to non-critical accessories and does not cover clinical instruments.
Pens, clips, and non-critical scissors should be checked for residue around crevices, handles, hinges, and other contact areas where dirt may collect. Cleaning methods may vary by material, finish, and manufacturer instructions, especially when small accessories include enclosed parts or repeated storage contact. Any accessory used in patient-care procedures should follow applicable facility rules and manufacturer guidance.
Caution: A tool that may be governed by workplace protocol should be cleaned according to that workplace protocol and any relevant manufacturer instructions. Clinical instruments remain outside the scope of this section, and clinical reprocessing guidance is not included.
When additional procedural requirements apply, facility rules and manufacturer instructions take priority. For broader clarification on accessory-related concerns, see common nursing accessories problems.
Hygiene Habits That Keep Nursing Accessories Cleaner
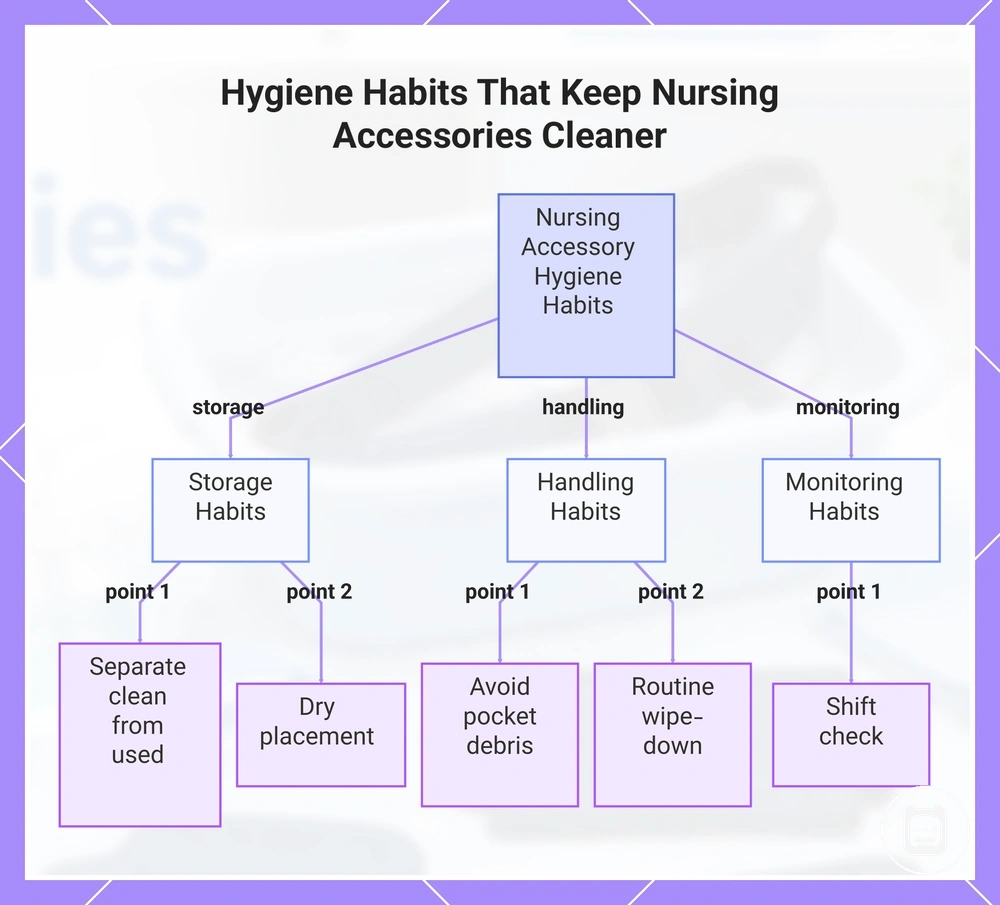
Hygiene habits reduce dirt buildup on nursing accessories by improving how items are stored and handled between deeper cleanings. Cleaner storage and consistent handling can limit residue accumulation on frequently touched surfaces. These habits help make routine maintenance easier and reduce maintenance friction.
A maintenance habit often starts with storage condition and daily handling. Separate storage helps keep clean and used items apart, while dry placement may reduce moisture-related residue concerns during storage. Avoiding pocket debris around accessories can reduce contact with lint, dust, and small particles. A routine wipe-down and shift check can make residue easier to identify before it accumulates. Storage and handling remain the main levers for cleaner reuse and easier maintenance.
- Separate storage: Helps keep clean and used items from unnecessary cross-contact.
- Dry placement: Reduces the risk of storing accessories in damp conditions.
- Avoid pocket debris: Limits contact with lint, dust, and loose particles.
- Routine wipe-down: Helps remove surface residue before buildup increases.
- Separate clean and used items: Makes accessory condition easier to monitor.
- Shift check: Helps identify residue, moisture, or wear before storage.
For example, an accessory kept in separate storage and a dry placement area may require less maintenance than one carried with loose pocket debris throughout a shift. Broader handling criteria may also involve hygiene and safety factors, but this section focuses on maintenance habits rather than workplace requirements.
This chart shows the three main categories of maintenance habits that reduce dirt buildup on nursing accessories: storage, handling, and monitoring.
When Cleaning Is Not Enough
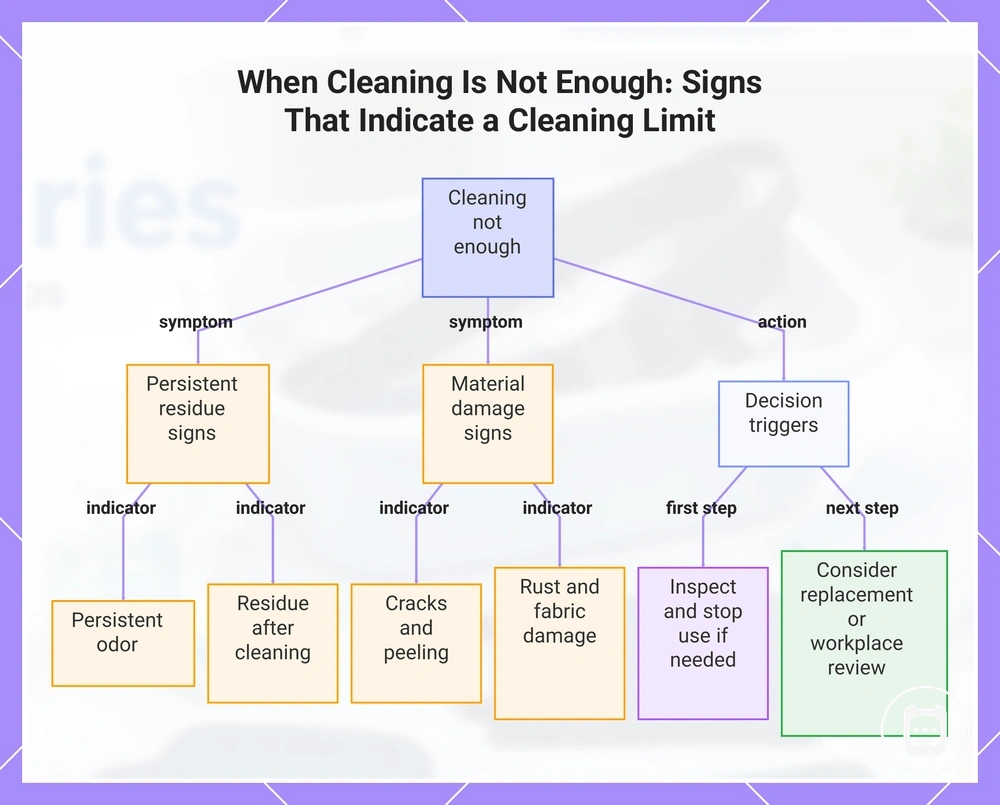
When damage signs remain after cleaning, additional cleaning may not be the right solution. Problems such as persistent odor, visible residue, material deterioration, or loss of function can indicate a cleaning limit rather than a need for more cleaning. Some signs require stopping use, checking workplace rules, or considering replacement.
A persistent odor may suggest moisture retention or material wear, especially when the odor returns after cleaning. Cracks, peeling surfaces, damaged fabric, weakened clips, cloudy badge sleeves, and rust are symptoms that should be inspected rather than repeatedly cleaned. Repeated contamination, recurring residue, or moisture retention after drying can be a replacement signal when the condition continues despite appropriate cleaning. The decision depends on the symptom, its effect on usability, and any applicable workplace requirements.
- Persistent odor: May indicate moisture retention or material wear; check whether the odor returns after cleaning and drying, then decide whether continued use is appropriate.
- Cracks: Can indicate material damage; inspect the extent of the damage and consider stopping use if function is affected.
- Peeling: May signal surface deterioration; check whether the affected area expands or interferes with use.
- Residue: Residue that remains after cleaning may indicate a cleaning limit; verify whether the material or surface condition has changed.
- Damaged fabric: Check for tears, fraying, or retained moisture that may affect usability.
- Weakened clips: Inspect holding strength and function before continued use.
- Cloudy badge sleeves: Check whether visibility or identification readability is affected.
- Rust: Inspect affected areas for continued material deterioration or reduced function.
- Moisture retention: Repeated dampness after drying can indicate a continuing problem that cleaning alone may not resolve.
- Repeated contamination: If the same condition returns repeatedly, review cleaning, storage, and item condition before deciding on continued use.
When symptoms continue after cleaning and inspection, the decision may shift from cleaning toward repair, workplace review, or when to replace accessories. For broader issue identification and clarification, see common nursing accessories problems.
This chart shows the key symptoms that indicate cleaning alone is not sufficient and the recommended next steps, helping you decide between inspection, repair, or replacement.